iPhone motherboard fast drain out battery problem?
- iPhone is leaking battery power quickly
- Consume or draining the battery fast even not using
- Replace a new battery but still draining fast
- Restored the firmware and still the same
A lot of shops claim they know how to repair motherboard, they really don't do well. Most of them send to another shop to do or they just blindly change whatever IC that is related to power, after they messed a lot of things, then they return it with the same problem plus wasted few weeks of time.
Today I'm going to teach you the SOP of checking the iPhone logic board drain problem. (SOP = Standard of the procedure)
(I uploaded a Cantonese video into YouTube. English subtitle provided) - YouTube Link
It's best you read the entire article instead of just watching the video above link. More details in this article.
Especially for those beginners who want to learn the repairing iPhone motherboard.
Tools require:
DC power supply
iPhone power cable
How to check the iPhone logic board drain battery problem
1st diagnosis
Unplug everything, including the battery, LCD, and all flex that connected to the motherboard. Except for the power button flex which we need it later. (We still can click the power button without the flex, but not saying that in this tutorial)The next step is to connect it to the Power Supply.
The power supply can read how much your iPhone is drawing the power.
Technically, it's called checking the "Current respond"
 |
| Set the Power Supply's current reading to 1A or lower. |
We must turn the knob slowly. Slowly giving the power voltage into the iPhone.
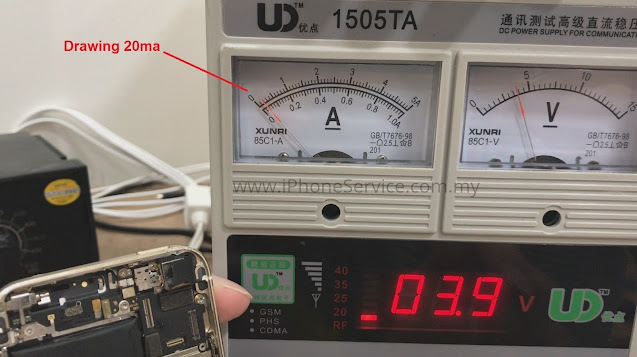
By watching the meter of Amperage we can know the iPhone motherboard is draining the power before we power it on.
Slowly raising the voltage until the battery level about 3.7v.
By watching the meter of Amperage we can know the iPhone motherboard is draining the power before we power it on.
Slowly raising the voltage until the battery level about 3.7v.
It should be staying in ZERO and NOT drawing any power before we switch the iPhone ON.
This means the current reading is at 0A.
This means the current reading is at 0A.
This is an iPhone 5S that having a battery drain quick problem. Even if we switch the iPhone off, it will still drain out the battery power.
Can it be fixed?
Yes, but it's not in today's topic.
What if the scenario above is not happening?
Yes, If so then go to the next step below.
If you sure the above is normal then we do the second step of the diagnosis - BOOT-UP TEST.
2nd Diagnosis: Boot-Up Test
What is boot-up test?
Boot-up-test is when we click the power button once and without holding it to turn on.
At that moment, the iPhone motherboard will do a self-loading test.
This is very useful to the technician that wants to read the current response from the motherboard.
At that moment, the iPhone motherboard will do a self-loading test.
This is very useful to the technician that wants to read the current response from the motherboard.
How to do the Boot-up test:
Connect the iPhone motherboard with the DC Power Supply.Hit the Power Button once. Just click it once lightly. Do not hold the button to power on. We don't want it to be fully power on.
 |
| When we just lightly click once on the power button, a normal iPhone would load from 0 into 80mA and then drop back into 0. |
If the iPhone has a charging IC problem, it can be easily detected by this method too.
 |
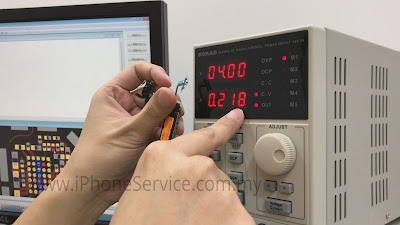
| This is a digital power supply. The function is the same. But it can be more accurate compared to Analog Meter Power Supply. More advanced diagnosis methods will need it. |
As you can see in the photo above, this iPhone booting-test is loading 218mA. It's very high compared to the normal iPhone. A normal iPhone is only loading 80mA in the boot-up test.
This indicates this iPhone logic board has a faulty circuit that drawing a lot of power. Confirmed it's a motherboard problem, so then we can scan it with a thermal camera to see which part getting hotter than usual.
The below video is the thermal camera that we use to scan the motherboard problem.
Maximum of iPhone comsumption is 1A. (1A= 1000mA)
But iPhone is never constantly loading 1A.
Only If CPU is doing a full speed benchmark test.
So far there is no app that would causing the iPhone CPU running in full speed all the time. Only just a few seconds.
By the way, this is an iPhone 7 that boot-up at 200ma.
This means it's already consuming 200mA when it's turned on.
I'm sure this iPhone 7 at least need to charge 3 times a day.
This means it's already consuming 200mA when it's turned on.
I'm sure this iPhone 7 at least need to charge 3 times a day.
Can it be fixed?
Yes.
If we are first hand to repair the motherboard, it will be a quick JOB which can be fixed within a day.
Yes.
If we are first hand to repair the motherboard, it will be a quick JOB which can be fixed within a day.
What if the above two scenarios are not happening?
Then the problem is coming from one of the flex, LCD, or camera.Connect all the flex back except the battery then do the methods above. Eventually, you'll found out it's the external problem which it's not a motherboard issue.
Then you're lucky. Because it's easy money. A Screw-drivers job that no need micro soldering.
We received countless failed repair iPhones from local shops. They messed up a lot of things which they shouldn't touch. They changed things without a proper diagnosis. Obviously, they have no training/educated.
The worst matter to me is their workmanship quality, they usually damaged the board further. In the end, we repaired it at a higher cost and a longer time to fix a simple original problem...
| Everyone can draw Mona Liza. But the problem is how good are they? iPhone motherboard repair is the same as art. |

